What is VMware vCenter Server?
VMware vCenter is a management server for VMware ESXi and Virtual Environment. Using vCenter we can manage ESXi Host, create VMware ESXi Clusters, Manage HA, DRS, Fault Tolerant, Deploy and manage VMs, Create VMFS datastores, manage storage Clusters and Manage Virtual Networking.
vCenter 6 is available for installation on Windows server and also available as vCenter appliance for deployment.
vCenter 6 Appliance is a Linux based vCenter with all the vCenter services like Platform service controller, web client, VMware Single Sing On, VMware Certificate authority and embedded PostgreSQL database.
VMware vCenter Windows based and Appliance both supports all the features of vCenter and minimum, maximum configuration.
VMware update manager is not included with Appliance vCenter 6. You need to install vCenter Update manager on Windows Server and update manager installation setup files are available in Windows based vCenter installation ISO files. So in this post we will see how to deploy VMware vCenter 6 update 2 Appliance.
Download VMware vCenter -
You can download VMware products for trial from VMware web site and use it for 60 days. During evaluation periods you can enjoy all the features of VMware products.
Requirements -
See VMware KB vCenter Appliance Requirements details.
e.g. vCenter requirements for Tiny environments -
- Storage – 120 GB
- RAM – 10 GB
- CPU 2 (vCPU)
Step by Step installation of VMware vCenter 6 update 2
1. Download ESXi 6 ISO installer form VMware site and install ESXi on one of the server. See how to install VMware ESXi and create VMs.
2. Download VMware vCenter 6 Appliance from VMware site and save it on Windows server.
3. Mount ISO in Virtual cdrom or extract files from ISO.
4. Once you mount ISO or extract files you can see list of installation files.
5. Go to vcsa folder and Install VMware Client Integration plugin. Execute the file and follow the installation wizard to complete installation.
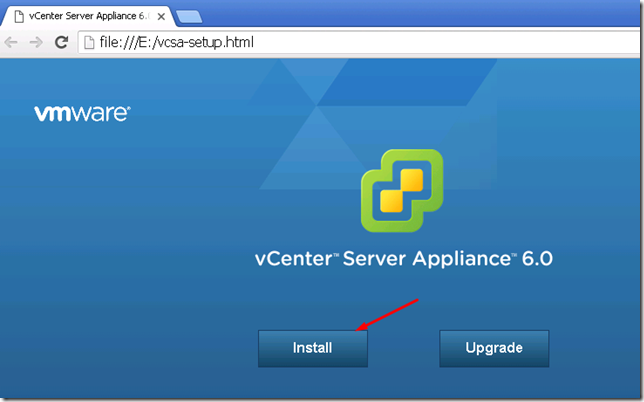
6. Go back to parent folder and open vcsa-setup.html with chrome browser. If you open it with Internet Explorer it may not work correctly.
7. Click on Install to start installation of VMware vCenter appliance.
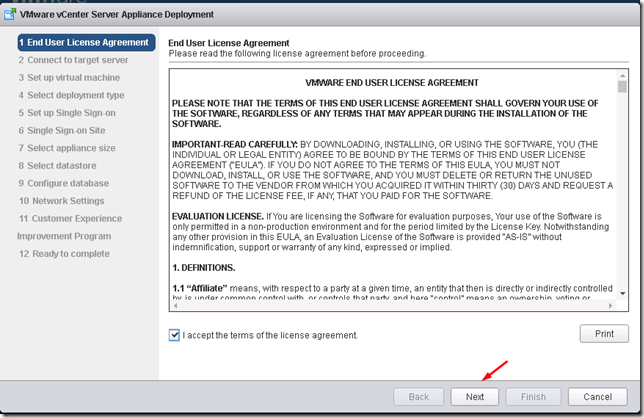
8. On the VMware vCenter Server Appliance Deployment Window, Accept the terms of the License agreement and Click Next.
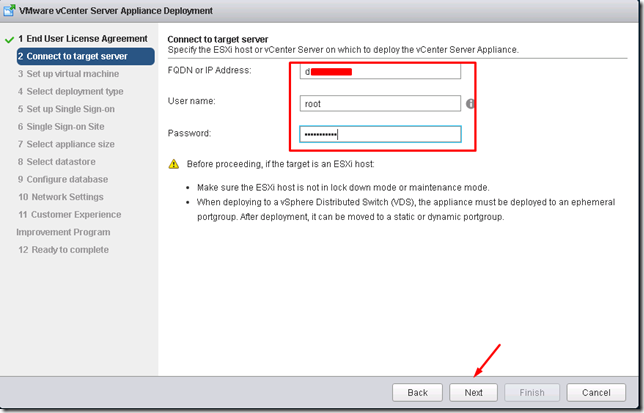
9. Provide the target ESXi Host or vCenter server details, where you want to deploy vCenter 6 u2. I am deploying vCenter appliance 6 on ESXi Host. Make sure you have setup Virtual Networking on ESXi Host for VM communication. Click Next to proceed.
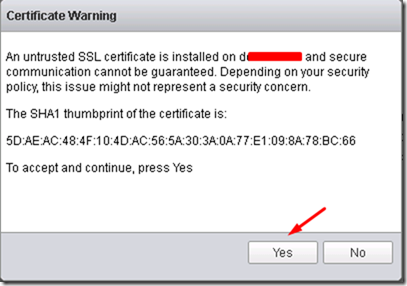
10. Wait for Installer to connect with ESXi host. Click on Yes to accept SSL certificate
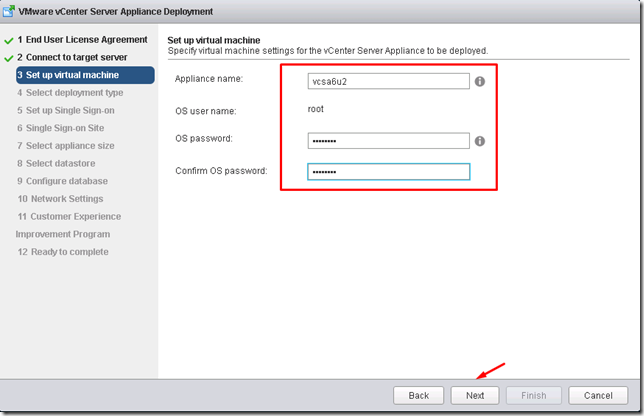
11. On the setup virtual machine page, Provide a name for appliance VM and Enter the root user password which you want to set. Don’t forget this password. Click Next.
Update – If deployment get stuck here on validation screen, start the deployment process with ‘Run as Administrator’. Also make sure VMware Client integration plugin is installed with ‘Run as Administrator’.
12. On the Deployment type, select Install vCenter Server with an Embedded Platform Services Controller. This will install all vCenter services and PSC in same VM. Click Next.
Other Deployment Options -
- Install Platform Services Controller – this will deploy VM and install only PSC on VM.
- Install vCenter Server – This will deploy VM and install only vCenter Services, during deployment you will need to point vCenter server to existing PSC server.
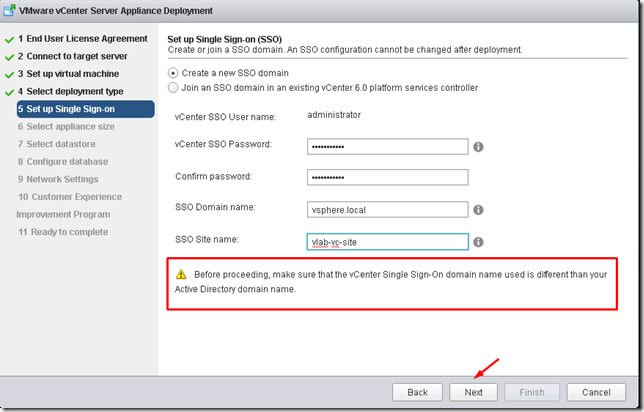
13. On the Setup Single Sign-on Page, Select Create a new SSO domain. this will present additional option to setup SSO domain.
Set SSO domain Administrator password. Don’t forget this.
SSO domain Name – enter SSO domain name e.g. vSphere.local ( this shouldn’t be same as your Organization domain name.)
Enter SSO site name. e.g. vlab-vc-site.
Click Next
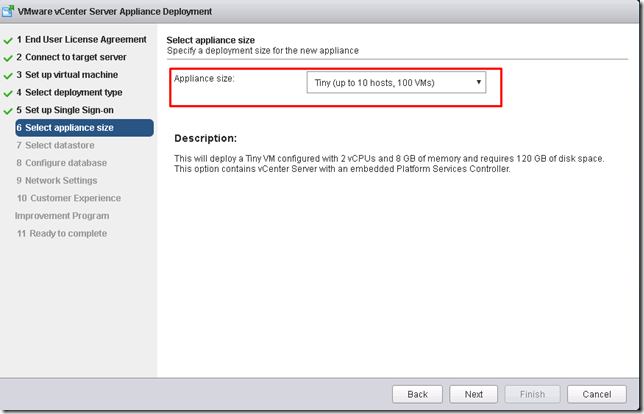
14. Select the size of your ESXi Host and VM inventory. Based on this selection vCSA VM would be deployed and CPU, DISK, RAM configuration will be set.
e.g. we are selecting Tiny – this will support 10 Hosts, 100 VMs with 2 vCPU, 8 GB RAM and 120 GB disk assigned for vCSA VM.
If you have more number of Host and VMs, select small, medium or large options.
Click Next to proceed.
15. Select the Datastore where you want to store this VM on ESXi Host. Select Enable Thin Disk Mode. This will use only required space on Datastore. Click Next.
16. Select Database, Use an embedded database (PostgreSQL). Click Next.
Note, vCenter appliance also supports external Oracle Database but it do not support Microsoft SQL DB.
17. On the Network Settings Page,
- Select the Virtual PortGroup name ( VM Network on ESXi)
- Select Ip Address family – IPv4
- Network Type – Static
- Network Address – Type IP Address which you want to assign to this vCenter server.
- System Name – Enter fqdn of vCenter server. make sure you create DNS forward and reverse lookup record. Otherwise installation may fail.
- Enter subnet mask.
- Enter Gateway
- DNS servers – Enter IP address of DNS servers.
- Configure time Sync – Enter IP address of NTP servers, you can also select to sync time with ESXi host. Make sure ESXi Host sync time with NTP server.
- Select Enable SSH – SSH will be useful for troubleshooting vCenter issues.
When ready Click on Next.
18. Select Checkbox to Join the VMware Customer Experience improvement program if you wish to Join it. Then Click on Next
19. Review the details provided to deploy vCenter server, if needed go back to make changes and click Finish to start the deployment of vCenter Server Appliance 6 update 2.
20. vCenter installer will download the OVF file on ESXi host and deploy it. Watch the progress.
Installer will power on the deployed vCSA VM, Configure vCenter services, setup networking and then it will be ready to use.
21. Login to ESXi Host, there you can see a new VM being deployed and configured. Don’t make any changes to VM until you get the message Installation Complete on Windows VM where we started the installer. Installation will take 15/20 minutes to complete the process.
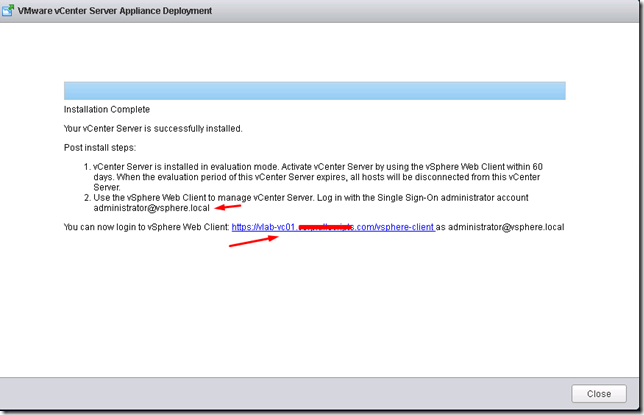
Review the Installation Complete message and click on Close to close the installation wizard.
22. Open the vSphere web Client URL in Browser and login to vCenter. Ignore/Accept the SSL certificate warning and continue.
Use Administrator@vsphere.local username and its password which you set during vCenter installation. Click Login.
23. After successful logon you can see the vCenter inventory and other configuration options. Navigate through different options to get familiar with it.
vCenter is installed in 60 days Evaluation mode, you need to go to Licensing and add License of vCenter server. After 60 days you will not be able to login to vCenter server and manage ESXi host, VMs. ESXi Host will get disconnected from vCenter server after 60 days if you don’t add valid License key.
With this we have successfully deployed VMware vCenter server appliance.
What’s Next - Add vCenter Appliance in Active Directory ( vCSA 6 )




![image_thumb11[1] image_thumb11[1]](https://lh3.googleusercontent.com/-gDx1ZrfJVOA/VzxMSnnXsyI/AAAAAAAAAuQ/Qka9bhFBjXs/image_thumb11%25255B1%25255D_thumb.png?imgmax=800)




No comments:
Post a Comment